


I thought it might be neat to start documenting every so often how I use my Totally Rad (Photoshop) Action pack to edit my images. Who knows if any of you are actually interested. But blogging is fun, and so is shooting and editing. So I thought I’d share a bit of my post-processing with you all. :)
Here is an image straight out of camera (SOOC from here on out).
.jpg "DSC_0033")
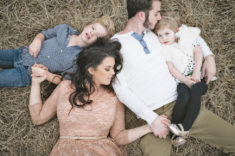
 I happen to LOVE the candid emotion of this shot, and the beautiful light pouring onto Ryan and Molly’s faces. BUT, it could still use some work! The lens I was using at the time could only stop down to an aperture of 2.8. I typically like to shoot wide open, because I love the creamy goodness that results from shallow depth of field (DOF). Another great thing about shooting wide open (meaning, shooting at your largest aperture, which is the same thing as shooting at the lowest numbered f/stop on your aperture ring) is the natural vignette it helps achieve. However, here, a 2.8 zoom lens didn’t really cut it, vignette-wise. Here’s where post-processing comes into play!
Before doing anything else, I must always first convert my .nef (RAW) file to a .jpg in Photoshop. (There are many advantages of shooting RAW, but maybe we’ll get into that some other time.) Then, with my trusty little Totally Rad Actions, I am able to achieve my desired effect in a matter of 60 seconds. First, I bump up the color using TRA‘s “Punch Out!!!” at 20%. The key to TRA‘s is NOT using effects at 100% opacity. You have to play with it until it looks natural. Second, I’d like for an even greater vignette to highlight the light on my subjects’ faces. I use the “Burn Out” action at, get this – 70%. I like, NEVER use this action at anywhere near over 30 or 40%. But for this image, I wanted as much of a vignette as I could get without it feeling artificial. Third, I throw “A Better Web Sharpen” into the mix (100%), and then do a little airbrushing (more on my airbrushing technique at some point if anyone is interested). The last step (although, it could have been done at any step in the game, is knocking down the exposure of the entire image by -0.15. Although I love the light in the photo, there’s a bit of harshness that can be controlled by decreasing exposure in post-processing.
And voilà!! Here is the final image!
.jpg "mollyryan_85") Recap: Punch Out!!! – 20%; Burn Out – 70%; A Better Web Sharpen – 100%; Exposure (not TRA) – -0.15
Recap: Punch Out!!! – 20%; Burn Out – 70%; A Better Web Sharpen – 100%; Exposure (not TRA) – -0.15
I hope this is helpful to those of you looking into different post-processing techniques. To check out Totally Rad Actions, go to: GetTotallyRad.com!!
Happy Wednesday! :)